
In the previous Hollow Knight, equippable Charms could be collected to augment your power with various bonuses, buffs, and changes to your character’s playstyle. In Silksong, these have been replaced by over 50 different Tools that can be obtained to give Hornet new abilities and attacks.
Unlike Charms, only a set number of color-coded Tools can be equipped depending on which active Crest Hornet is using. The color of the Tool also indicates if the bonus Hornet receives is an offensive ability, a passive bonus, or a utility change:
- Red Tools are offensive traps and attacks that have a finite amount of resource, which can be recovered at a Bench by drawing from the Shell Shards in your inventory. The first equipped Red Tool can be deployed by holding Up and pressing R1/RB, while a second Red Tool can be used by holding Down and R1/RB.
- Blue Tools are passive bonuses that can bolster Hornet’s Health or Silk Spool in various types of ways, and do not need to be activated.
- Yellow Tools are utility changes that can alter how certain mechanics work and make it easier to obtain currencies and collectibles, or find your way in the world.
For a list of known Tools and where to find them in Silksong, see our list below.
| Tool Name | Tool Type | Description | Region Found | Checkbox |
|---|---|---|---|---|
| Magnetite Brooch | Yellow | Causes fallen Rosary Beads to gravitate toward you. | Moss Grotto (Sold at Bone Bottom) | |
| Shard Pendant | Yellow | Collect more Shell Shards from enemies. | The Marrow | |
| Compass | Yellow | Tracks your current location when viewing the Map. | The Marrow (Sold by Shakra) | |
| Druid’s Eye | Blue | Taking damage secretes a green elixir in your Silk Spool that turns to Silk. | Moss Grotto (Mosshome – Berry Picking Quest Reward) | |
| Straight Pin | Red | A light throwing tool that launches small pins out in front of you. | The Marrow | |
| Sting Shard | Red | Throws out a spiked trap in the air that expands and detonates when touched. | Deep Docks (Sold by the Forge Daughter) | |
| Magma Bell | Blue | Negates heat damage from standing on fiery surfaces and halves damage from fiery sources (does not include lava). | Deep Docks (Sold by the Forge Daughter) | |
| Warding Bell | Blue | Shields the bearer as they bind their wounds. | Far Fields | |
| Flintslate | Red | Temporarily heats your Needle weapon to deal increased damage with a fiery element. | Deep Docks | |
| Curveclaw | Red | Throws a curved boomerang forward that arcs backward and up into the air. | Hunter’s March | |
| Fractured Mask | Blue | Protects your final Health Point from a killing blow, but shatters on impact until you can rest at a Bench. | Hunter’s March (Sold by the Mottled Skarr) | |
| Weighted Belt | Yellow | Removes knockback when attacking or taking damage. | Far Fields (Sold at Pilgrim’s Rest) | |
| Threefold Pin | Red | An offensive ranged tool that can be thrown in a fan of three blades moving outward. | Greymoor | |
| Fleabrew | Red | Drink to temporarily increase speed of movement and attacks for a short duration. | Greymoor (Flea Caravan) | |
| Longpin | Red | Throws a long pin at distant enemies and can pierce armored hides. | Shellwood/Bellhart | |
| Pollip Pouch | Blue | Coats all red tools with poison. | Shellwood (Rite of the Polip Quest Reward) | |
| Multibinder | Blue | Binding takes longer, but heals more health points. | Bellhart (Sold after completing My Missing Courier) | |
| Weavelight | Blue | Increases the regeneration of Silk by one extra spool. | Weavenest Atla | |
| Silkspeed Anklets | Yellow | Draws upon Silk to increase Hornet’s sprinting speed. | Far Fields (Weavenest Cindril) | |
| Pimpillo | Red | Tosses an explosive pouch at enemies to deal heavy damage. | Greymoor | |
| Barbed Bracelet | Yellow | Increases damage taken, but also increases damage dealt by needle. | Sinner’s Road | |
| Tacks | Red | Scatters sharp pins along the ground that can damage enemies multiple times. | Sinner’s Road (Roach Guts Quest Reward) | |
| Silkshot | Red | An ancient Weaver weapon repaired from a Ruined Tool that can fire shots from shell canisters using Hornet’s own Silk. The type of shot will depend on how the Ruined Tool was repaired. | Bilewater | |
| Dead Bug’s Purse | Yellow | Allows you to keep a portion of your Rosaries upon defeat. | Wormways | |
| Plasmium Phial | Red | Inject to give yourself one or more temporary blue life points that are removed when damage is taken. | Wormways (Alchemist’s Apprentice Quest Reward) | |
| Magnetite Dice | Yellow | Can randomly allow you to avoid taking a single hit. | Blasted Steps | |
| Delver’s Drill | Red | Attacks with a multi-hit drill moving downwards into enemies below you. | Underworks | |
| Ascendant’s Grip | Yellow | Allows you to hold your position while clinging to a wall. | Choral Chambers (Sold at Songclave after completing The Wandering Merchant) | |
| Spool Extender | Blue | Grants additional Silk Spools. | Choral Chambers (Sold at Songclave after completing The Wandering Merchant) | |
| Claw Mirror | Blue | When binding, emit a flash of light that damages nearby enemies. | Whispering Vaults (Defeat Trobbio) | |
| Injector Band | Blue | Decreases the time needed to perform a Bind. | Whiteward | |
| Cogwork Wheel | Red | Throws down a sawblade that travels along surfaces in a straight path, including walls and ceilings. | Underworks (Sold by the Twelfth Architect) | |
| Sawtooth Circlet | Blue | Activating the Drifter’s Cloak creates a blade attack. | Underworks (Sold by the Twelfth Architect) | |
| Scuttlebrace | Yellow | Allows you to perform an evasive scuttle and move rapidly backwards. | Underworks (Sold by the Twelfth Architect) | |
| Cogfly | Red | Creates a winged cogwork companion that will seek out and attack nearby foes. | High Halls | |
| Rosary Cannon | Red | Repurposed mechanism that can load Rosaries to be rapidly fired at enemies instead of being used as currency. | High Halls | |
| Memory Crystal | Blue | Creates a crystal memory of Hornet when damage is taken, and explodes into sharp spines if an enemy touches it. | Mount Fay | |
| Thief’s Mark | Yellow | Allows you to gain extra Rosaries from defeated foes, but Rosaries will be dropped on taking damage. | Blasted Steps (Sold by Grindle) | |
| Snitch Pick | Blue | Pierce enemy shells and steal Rosaries from them. | Blasted Steps (Sold by Grindle) | |
| Reserve Bind | Blue | Hold’s a single Bind’s worth of Silk that can be used if you do not have the reserves needed to perform a Bind. | High Halls (Defeat the Second Sentinel) | |
| Conchcutter | Red | Fires a spiral weapon at an angle that ricochets off walls several times. | Sands of Karak | |
| Wispfire Lantern | Blue | Creates explosive Wisps when enemies are present, but will consume Silk to create. | Wisp Thicket (Defeat the Father of the Flame) | |
| Voltvessels | Red | Electric orbs that can be thrown as a bola to explode in the air, or transformed to stake into the ground and create a pillar of electricity. | Memorium | |
| Spider Strings | Yellow | Expands and strengthens the effect of the Needolin. | Choral Chambers (Sold at Songclave after completing The Lost Merchant) | |
| Wreath of Purity | Blue | A protective band that repels Muckmaggots and their poison status. Will break after 12 charges, but can be repaired when resting at a Bench. | Putrified Ducts | |
| Quick Sling | Blue | Doubles the number of Red Tools thrown. | Bilewater | |
| More Coming Soon! |
Silksong Tool Locations
Below you’ll find an in-depth list of the locations of each Tool you can find in Hollow Kinght: Silksong, including the region they are found in, and any prerequisites needed to claim them. You can scroll down to see each Tool in the order they can first be obtained, or click on a name below to jump to a section:
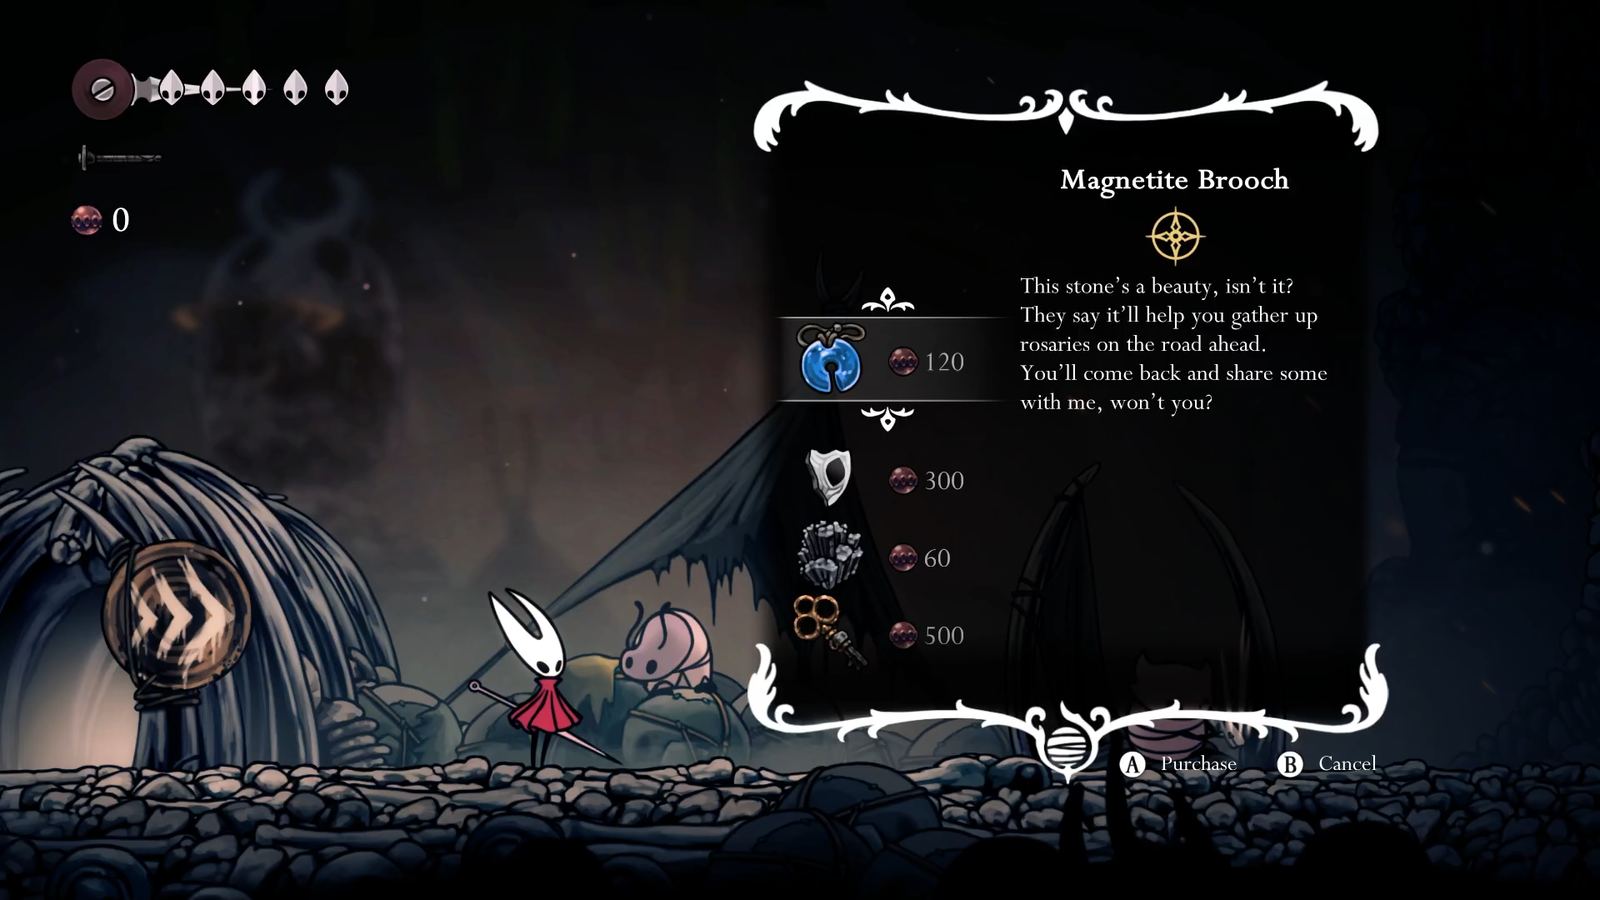
Magnetite Brooch
- Tool Type: Yellow
- Effect: Causes fallen Rosary Beads to gravitate toward you.
- Requirements None
The Magnetite Brooch is located in Bone Bottom, sold by Pebb for 120 Rosaries. Pebb is located directly between the Bellway Station entrance and the Bone Bottom Wish Board.
Given how many Rosaries you’ll be collecting over the course of the game, and how many can explode off enemies or strings, this Tool is almost always worth equipping to save you the trouble of chasing down stray currency, unless there’s a more relevant tool, or you’re up against a Boss.
Shard Pendant
- Tool Type: Yellow
- Effect: Collect more Shell Shards from defeated enemies.
- Requirement: None
The Shard Pendant is located in The Marrow. It’s found in a hidden alcove north of the Bench near Bone Bottom past the first bench. To get it, enter the long fiery room and look for a series of platforms to jump up and back to the left above the entrance, where you’ll find a pathway to a vertical room above.
Here, you’ll need to jump up a few platforms that crumble after a moment, avoiding or defeating several flying Caranids, then head west into an alcove guarded by a Skull Brute. You’ll find the Shard Pendant inside the small room.
Since you need Shell Shards to replenish the ammo for your Red Tools, this Tool is best equipped when you’re low on resources, or otherwise plan to traverse areas with more “beast-like” bugs than ones that only drop Rosaries like Pilgrims. Once you’ve reached a max amount stored, it’s best to swap this Tool out for something else.
Compass
- Tool Type: Yellow
- Effect: Tracks your current location on the Map.
- Requirement: None
The Compass is located in The Marrow in Silksong, purchased from Shakra for 70 Rosaries. To find Shakra, head east into The Marrow from Bone Bottom. Jump up on the ledges in the main lava-filled room and head north, fighting or avoiding the enemies as you go.
After reaching the top of the vertical room with crumbling platforms, head left into a long passage with two levels, sticking to the lower path. Follow the copper rings and sound of singing until you can hop onto a fallen block to reach the top level, and you’ll spot Shakra in the top left corner, just before a path leading back into the Moss Grotto’s Mosshome area.
Note that if Shakra leaves this area before you can find enough Rosaries to purchase the Compass, she can be found on a ledge just outside of Bone Bottom selling maps of areas you’ve been to already.
The Compass is a must-have as you expand the map and find yourself unsure of exact positioning in the world, but after enough exploration you should try to remember the layout of the world and its points of interest to rely less on it, so that you can eventually sub out the Compass for more useful Tools.
Druid’s Eye
- Tool Type: Blue
- Effect: Taking damage secretes a green elixir in your Silk Spool that turns to Silk.
- Requirement: Silk Spear
The Druid’s Eye is a quest reward that is given in Mosshome, located above in Moss Grotto. to reach the Moss Druid, you’ll need to get through a tangle of silk, which can be done by learning the Silk Spear ability in the same room.
Once you are able to clear a path and reach the Moss Druid, talk to them and then complete the Berry Picking Wish by finding three Mossberries for the Moss Druid, and she’ll give you the Tool as a parting gift.
The Druid’s Eye is a useful tool to regain lost Silk while taking damage so you can heal that much faster. However, it only works best if you’re actively taking damage a lot, and the more proficient at evasion you become, the less likely you’ll want to use it.
Straight Pin
- Tool Type: Red
- Effect: Launches small pins out in front of you.
- Requirement: Silk Spear
The Straight Pin is located in The Marrows, on the eastern side, which you can access after getting the Silk Spear from Mosshome.
The Tool is located in the same interior prison room as the Bench above to the entrance to Deep Docks. This prison room features several cells above the bench, where you can free a bug named Grindle by striking the cell door. After freeing him, jump up through the roof of his cell to grab the Straight Pin.
Note that if you do not free Grindle on your first exploration in this area, he will break out himself, and leave the Straight Pin in his cell.
As the first offensive Tool you can find, the Straight Pin is an effective attack for whittling down enemies at range, though it is limited to a horizontal plane. It’s a must-have early game, and can still be useful later on as long as you’re facing foes on an even playing field or are adept at hitting moving targets.
Sting Shard
- Tool Type: Red
- Effect: Throws out a spiked trap in the air that expands and detonates when touched.
- Requirement: 1 Craftmetal
The Sting Shard is located in Deep Docks, in the same place as the Magma Bell, and sold by the Forge Daughter merchant for 140 Rosaries and 1 Craftmetal.
You’ll find the Forge Daughter below the level that leads to Lace and the entrance to the Far Fields. Before reaching Lace’s arena, look for a floor lever to drop down to a lower level. At the bottom of the next lift, head right and defeat a gauntlet of enemies, and then travel up the platforms to a landing above where the forge can be found.
The Sting Shard is an incredibly useful trap-oriented Tool that is best used to lure in foes toward your deployed floating spike shard. If an enemy touches it, the ball of spikes will enlarge and skewer anything nearby, before exploding to send the shards scattering in all directions. The trap can also explode if you strike it yourself, or if any other hazard or projectile hits it, making it effective at pinning down fast-moving or flying enemies, and can hit multiple targets with a single detonation.
Magma Bell
- Tool Type: Blue
- Effect: Negates heat damage from standing on fiery surfaces (does not include lava).
- Requirement: Craftmetal
The Magma Bell is located in Deep Docks, in the same place as the Sting Shard, and sold by the Forge Daughter merchant for 110 Rosaries and 1 Craftmetal.
Despite it’s description, the Magma Bell provides more benefit than in the immediate surroundings of the Deep Docks. While it does allow you move over smoldering terrain without taking damage, it also has the added bonus of halving extra damage you would normally take from attacks dealing fire damage (though the bell requires a short duration to recharge its negating effect). This makes it an incredibly stellar tool against any foe dealing fire damage, and is particularly useful against The Last Judge, the Father of the Flame, and the Forebrothers deeper in this region.
Warding Bell
- Tool Type: Blue
- Effect: Shields you from damage as you Bind.
- Requirement: Swift Step
The Warding Bell is located in the Far Fields in Silksong. It is found on a corpse in a passageway west of both The Seamstress and where you fight the Fourth Chorus boss.
To reach it, head down below the large vertical room where Shakra and the Bellway entrance is, and look for an opening along the bottom left wall.
Head through the short passage and jump upwards to find a hidden path above, where the husk of a Deep Docks worker holds the Tool.
Note that if you use the Simple Key on the locked door past the Forge Daughter in the Deep Docks, you can take the new pathway that leads out to this room, skipping Lace and the main entrance to Far Fields.
The Warding Bell is an incredibly useful defensive Tool early on as you learn the timing of your healing Bind. If attacked before the Bind finishes, a large flash will knock enemies back and absorb the damage that would otherwise land. However, this will still interrupt the Bind’s effect, and you’ll still lose the Silk from the attempt.
Flintslate
- Tool Type: Red
- Effect: Temporarily heats your Needle weapon to deal increased damage with a fiery element.
- Requirement: Simple Key, Swift Step
The Flintslate is located in Deep Docks, just past a locked door below the Forge Daughter, which you’ll need a Simple Key to open.
Go through the door and past the first room with columns of platforms on chains to reach a second similar vertical cavern (just past defeating a large Deep Diver enemy) Use the second group of hanging platforms to climb higher. At the top of these platforms is an open alcove to the west; you’ll find the Flintslate here.
Curveclaw
- Tool Type: Red
- Effect: Throws a curved boomerang forward that arcs backward and up into the air.
- Requirement: Drifter’s Cloak (recommended)
The Curveclaw is located in Hunter’s March in Silksong. It is sold by Mottled Skarr, a vendor in the northwest section of the area, for 140 Rosaries (who also sells the Fractured Mask).
To reach this merchant, you’ll need to brave the gauntlet of the Hunter’s March, an optional region that can be entered via the Marrow, in a room just above the Prison and guarded by a large skull ant.
The region itself includes tough platforming and waves of enemies. Once you defeat the enemy gauntlet, you’ll find a long vertical shaft you can explore upward to find a room with a (trapped) bench, and above that is another room full of Shell Shards. Jump into the back wall, and you’ll find a secret path leading through more traps to where the merchant resides.
If you’ve reached Act 2, Mottled Skarr will likely be dead. In this case, you’ll find the Curveclaw in the room above his body, meaning you don’t need to purchase it.
With its boomerang effect, the Curveclaw is an excellent mid-range weapon that can hit multiple times as it stops to reverse course and come back a bit higher than where you tossed it. Due to its range and trajectory, it’s a very handy Tool to use against large or flying Bosses that you can stand out of melee range and try and score multiple hits as it curves around their body.
Fractured Mask
- Tool Type: Blue
- Effect: Protects your final Health Point from a killing blow, but shatters on impact until you can rest at a Bench.
- Requirement: Drifter’s Cloak (Recommended)
The Fractured Mask is located in Hunter’s March in Silksong. It is sold by Mottled Skarr, the same vendor who sells the Curveclaw, for 260 Rosaries.
If you’ve reached Act 2, Mottled Skarr will likely be dead. In this case, you’ll find the Fractured Mask on his corpse.
One of the best defensive Tools in the game, the Fractured Mask essentially gives you a Cheat Death perk on an attack that would normally kill you. Any attack that would defeat you will instead shatter the mask but leave the Health Point intact, giving you another chance to survive. However, the mask can only be repaired by sitting at a bench. This also makes it one of the best Tools to equip for those who want to play the Steel Soul mode but are afraid of taking a stray shot and dying. If your Fractured Mask breaks, that’s your cue to exit the game and try again.
Weighted Belt
- Tool Type: Yellow
- Effect: Removes knockback when attacking or taking damage.
- Requirement: Drifter’s Cloak
The Weighted Belt is sold at a small rest stop atop Far Fields, known as Pilgrim’s Rest. It is sold by the proprietor of the inn, Mort, for 160 Rosaries.
To reach the Pilgrim’s Inn, you’ll need to have obtained the Drifter’s Cloak from the east side of the region, and use the air vents to ride upwards until you hit a ceiling gate that needs to be unlocked, with a bench sign pointing right. It’s here you’ll find the Pilgrim’s Inn (Note that it costs 30 Rosaries just to open the door, which will lock after you leave unless you destroy the gears after entering).
The Weighted Belt is a Tool best used for those who preferred a similar Charm Effect in the first Hollow Knight, and can work well with certain Crest fighting styles, but you’ll need to account for the lack of knockback and not accidentally bump into enemies or you’ll take damage.
Threefold Pin
- Tool Type: Red
- Effect: An offensive ranged tool that can be thrown in a fan of three blades moving outward.
- Requirement: Drifter’s Cloak
The Threefold Pin can be found in the region of Greymoor, on the far eastern side above the area known as Craw Lake. To reach it, you’ll need to first enter the building on the middle of the lake and defeat the Craw enemies inside to activate a series of balloon platforms all around the area.
Once deployed, leave the building and use the balloons to move up the large area above the lake by heading up the left side and bouncing off balloons to climb up to the very top of the room.
Instead of climbing up to the next room where the Thread Storm Silk Skill is, drop off the ledge and float to the right using your Drifter’s Cloak to find a ledge on the far right side, high above a Lost Flea, where a Tallcraw guards the ledge.
Defeat him, and move right to find a small alcove beyond the ledge where the Tool can be picked up.
Fleabrew
- Tool Type: Red
- Effect: Drink to temporarily increase speed of movement and attacks for a short duration.
- Requirement: None
The Fleabrew is a special reward given for both completing The Lost Fleas by finding any 5 Fleas while exploring Pharloom, and also talking to Fleamaster Mooshka at the caravan in The Marrow, prompting them to move just outside of Bellhart in Greymoor.
Whether you opt to travel with them or not, speak to Grishkin nearby in the caravan to be awarded the brew.
The Fleabrew is a rather unique tool, in that the tool is a consumable that gives Hornet an offensive buff, rather than being a damaging projectile. For around 10 seconds after imbibing, Hornet’s movement and attack speed will increase significantly, making it an effective Tools against tricky bosses. However, unlike most other Tools, it cannot be replenished with Shell Shards, and you will instead need to return to Grishkin and pay Rosaries to refill your charges.
Longpin
- Tool Type: Red
- Effect: Throws a long pin at enemies and can pierce armored hides.
- Requirement: None
The Longpin is a hidden tool located on the border of Shellwood and Bellhart, which you can find after passing through the haunted town (or after you free it from its curse).
In the first large open room in Shellwood after leaving the town of Bellhart, climb up the platforms and head to the far right of the room where Bellhart’s border is, and look along the wall of giant bells for a nest of purple flying bugs. You’ll need to keep attacking the nest while dodging the endless bugs until the nest breaks apart and reveals a pathway. Inside, you’ll find the Longpin at the end of a small hunter’s room.
The Longpin is a fairly slow projectile that can be flung out in a low arc, and is more of a situational tool than anything else. It’s best use is cracking the armor of tough enemies that may otherwise prove hard to crack or find an opening — so consider swapping to it if you ever come up against tough foes with narrow windows where your needle may otherwise bounce off.
Pollip Pouch
- Tool Type: Blue
- Effect: Coats all red tools with a poison effect.
- Requirement: Cling Grip
The Pollip Pouch is a Quest Reward for completing the Rite of the Pollip Wish given by Greyroot in their home in Shellwood.
To find Greyroot, enter Shellwood heading left from Bellhart, and travel up and over left past the first bench room to a second large area with a pool of water, to the right of where you meet Shakra. Climb up into the top left of the large room and you’ll find the entrance to Greyroot’s home.
To complete their quest, you’ll need to find all six purple Pollip Hearts that can be found around nests across Shellwood, signified by the purple flowers that bloom nearby. As they are located all across the region, you’ll need to gain the Cling Grip ability in the northern part of the region to reach them all (see the map above), and then return to claim your reward.
The Pollip Pouch is an interesting and unique Tool, in that it bolsters the effect of existing weapons, with a few caveats. All red tools, regardless of how they are deployed, now deal a poison effect when an enemy is struck by them, dealing additional damage over time. This makes them highly useful against durable enemies and bosses. However, the effect applies to ALL red tools, which includes the Fleabrew and Plasmium Phial, which will now poison in addition to their standard effects. This means if you rely on these buffs, you’ll likely want to steer clear of using it, but Crests with multiple red tools – like the Architect Crest – are vastly improved when each offensive tool deals more damage.
Multibinder
- Tool Type: Blue
- Effect: Increases amount healed by Bind, but also time needed to Bind.
- Requirement: None
The Multibinder is a support tool sold in the town of Bellhart by the merchant Frey for 880 Rosaries. However, it will only appear in their stock once you have fulfilled their wish by completing the My Missing Courier Sidequest.
To find Tipp the Courier, you’ll need to follow their trail by passing through all of Shellwood to its lower west exit leading to a broken bridge. Follow the trail down the broken bridge below an entrance to the Wormways on the left side, and you can rescue Tipp from some enemies. Once you return to Bellhart, Frey will have new items in stock to purchase.
The Multibinder is a helpful tool with a steep cost, as it allows you to heal 5 health points, up from 3. However, it will add to the already considerable time needed to heal through Binding, and given the speed of battle and many boss fights, you may not have many safe spots in which to heal. Therefore, it’s a better tool to use in-between fights rather than during them.
Weavelight
- Tool Type: Blue
- Effect: Increases the regeneration of Silk by one extra spool.
- Requirement: Needolin
The Weavelight is a tool that will appear after defeating the Moss Mother Duo Bosses located in Weavenest Atla, an optional region in Silksong.
To reach the Weavenest, you’ll need to return to the Moss Grotto once you’ve gained the Needolin ability from freeing Bellhart from the Widow. Head to right from the ruined chapel to find a large doorway that you can now unlock by playing the Needolin.
Once you’ve activated the lift in the Weavenest, take the elevator down and exit left to find a bench by a pool of water, and you’ll find you can swim through to a secret passage further left.
Follow this passage to the very end to climb up to an arena where you’ll be ambushed by a Moss Mother, with a second close behind. Defeat them both, and the Tool will drop from the ceiling for you to pick up.
The Weavelight’s description indicates “increases the speed of Silk regeneration”, but that’s not entirely true. What it actually does is give you one extra regenerating spool of Silk, similar to the effects of having a Silk Heart — but it will not increase the speed of that regeneration. This means once you have found all 3 Silk Hearts, you can use the Weavelight to have your Silk regenerate up to 4 spools before stopping — which can be useful if you plan on using Silk Skills a lot.
Silkspeed Anklets
- Tool Type: Yellow
- Effect: Draws upon Silk to increase Hornet’s sprinting speed.
- Requirement: Needolin
The Silkspeed Anklets are a reward given for activated the Weavenest Cindril, which is a small sub-region located within the Far Fields.
To access the Weavenest, you’ll need to have gained the Needolin ability from defeating the Widow over Bellhart. Return to the Far Fields, and head east past the Seamstress to the very edge of the map where a large door is, and play the Needolin to enter. Once inside, sprint normally along the floor panels to activate the Weavenest, and the Tool will appear at the end allowing you to pick it up.
This tool is a fairly situational one, as its speed increase only works best when traversing large distances. It’s a great choice when you need to backtrack to previous areas, or when taking our Courier missions in Bellhart.
Pimpillo
- Tool Type: Red
- Effect: Tosses an explosive pouch that detonates on enemy impact.
- Requirement: Cling Grip, Craftmetal
The Pimpillo is an offensive Tool that can be crafted at a specific workbench located high up in the region of Greymoor, however you will also need a Craftmetal to construct it yourself.
To reach this area, you will have needed to obtain the Cling Grips in Shellwood, and then return to the large mill buildings on the left side Greymoor. Climb your way up the western vertical mill room and use the wooden wall to reach a walkway leading left.
Cross the bridge going west to find a lone locked bellhome, and then climb the wooden platforms leading upward to a body with a Rosary String. However, if you keep wall-jumping up the left side, you can reach a secret room above with a crafting workbench. By using up 1 Craftmetal, you can construct the tool to keep.
The Pimpillo is fairly exceptional tool, and while it can only be used in limited quantities, it deals a large amount of damage in a sizeable blast radius, making it a great crowd control weapon or taking down heavy hitters. However, be aware that the speed of the toss is fairly slow, and you’ll need to aim carefully or you’ll waste it.
Barbed Bracelet
- Tool Type: Yellow
- Effect: Increases damage taken, but also increases damage dealt.
- Requirement: Cling Grip
The Barbed Bracelet is a support Tool that can be found in the optional region of Sinner’s Road, high above Greymoor. To reach this area, you’ll need to have gained the Cling Grip ability in Shellwood.
Once you are able to wall-jump, return to Greymoor and climb up the mill to exit out high above the Halfway Home, and climb up the far right wall to enter Sinner’s Road, head along the main road to the right, past the first vertical room into a second hall full of Roach cages, and look for an open one at the very end with a hole you can drop down.
Carefully float down all the way to avoid the spikes on all sides to reach a pool at the bottom where a body holds the tool, and use the Cling Grip to jump back up.
As its effect implies, the Barbed Bracelet is a high risk, high reward type of tool that can improve your damage output, but at the risk of taking increased damage from all sources. It’s best paired with a quick-hitting Crest style like the Wanderer’s Crest, and for tearing through small groups of unwitting enemies, but much more dangerous against bosses unless you are confident in your evasive abilities.
Tacks
- Tool Type: Red
- Effect: Scatters sharp pins along the ground that can damage enemies who tred on them multiple times.
- Requirement: Cling Grip
Tacks are an efficient ground-based offensive tool that are awarded by completing the Roach Guts Quest, which is gained by undertaking a Wish from Crull and Benjin in their home at Sinner’s Road.
To reach Crull and Benjin, look for a large, trap-filled room to the right of the first main vertical area in Sinner’s Road (to the right of the bench and Shakra) which has two entrances. From the higher entrance, you’ll need to use the Cling Grip to leap up and dash against the left wall all the way to the top. Next, use your downward slash to pogo bounce across the spiky traps just below the ceiling heading right, and float the rest of the way to reach a high ledge where the friendly NPC live.
They’ll ask you to collect guts from the Roach hounds that populate Sinner’s Road, which are largely found in the two long hallways by the lower entrance to Sinner’s Road, and another long hallway above first vertical room. Return to them with the Roach Guts they need, and they’ll award you the Tacks.
Somewhat ironically, the Tacks are a great trap tool for dealing with ground-based enemies like the Roaches, as Hornet will sprinkle several of the sharp caltrops along the ground that can deal a lot of damage quickly the longer an enemy steps on them. This makes them highly effective against slow moving enemies that cannot fly or jump, but useless against fliers.
Silkshot
- Tool Type: Red
- Effect: Scatters sharp pins along the ground that can damage enemies who tred on them multiple times.
- Requirement: Cling Grip, Needolin (for Ruined Tool and Forge Daughter Variant), Clawline (for Twelfth Architect Variant), Faydown Cloak (for Original Variant), Craftmetal
The Silkshot is an offensive weapon that is unique in that it is initially found as a Ruined Tool Key Item, and must be repaired via one of three sources before it can be used properly. Depending on where you take the Ruined Tool for repairs, the way the Silkshot fires will be different.
To start, you can find the Ruined Tool in one of the Weavenests located in Bilewater. It can be found relatively early compared to the rest of the region, as you can enter from Sinner’s Road and keep heading all the way to the right, diving into a pool of muckmaggot water to swim through an opening leading to the entrance to Weavenest Murglin.
Inside the Weavenest, drop down to the lower level and swim through the muck to climb back up and look for a bench on the left with the Ruined Tool. To repair it, you’ll have three different options, which open up as you explore more of Pharloom.
The first option is to return to the Forge Daughter in the Deep Docks. For the price of 240 Rosaries and 1 Craftmetal, she will repair the Silkshot using her own tools, turning it into a gun that shoots silk-empowered shells with a decent rate of fire and a little knockback.
Once you’ve reached Act 2 and found the Clawline in the Underworks’ Cauldron, you can head up to the Twelfth Architect just above where the Clawline is found to ask her to repair it instead. For 130 Rosaries and the Craftmetal, she will infuse it with a burst-fire attack that fires 3 shell shots rapidly and with a bit of a rise in aim from your initial shot.
Finally, once you scale the top of Mount Fay and obtain the Faydown Cloak. Drop off the peak to the right and you’ll find a ledge leading into a forgotten Weaver ruin. In the corner you can find a workbench, where you can supply your own Craftmetal to repair it yourself. With its true form restored, it will fire a shell canister as more of a high-powerer sniper shot in a straight line and can pierce through targets, but takes a moment to fire.
Given the variety, it’s up to you how to repair the Ruined Tool into the Silkshot, but if you can wait long enough, we highly recommend restoring its original form in Mount Fay, as the attack’s piercing ability and extreme range makes it very handy, though you may find more use against multiple targets if you get the Twelfth Architect’s variant.
Dead Bug’s Purse
- Tool Type: Yellow
- Effect: Allows you to keep a portion of your Rosaries upon defeat.
- Requirement: None
The Dead Bug’s Purse is a helpful tool for those prone to death, and can be found in the optional region of The Wormways through multiple paths.
The easiest way to reach the Dead Bug’s Purse is by traveling through Shellwood all the way west to a large broken bridge leading down to the Wormways, but it is also possible to reach it earlier by using a Simple Key at the lower Wormways entrance found across from Mosshome in the Moss Grotto (though you will have to navigate more tunnels to wrap around to the path up to the exit toward Shellwood.
Whether you use the Simple Key and pass through a large stone vertical room, or come down from Shellwood into a sloping tunnel going downward, you’ll find this tool in a large room where Shakra waits on a ledge above some crumbling platforms.
North of Shakra’s perch is a tunnel leading up with Gorm worms continually falling down the narrow shaft. Dodge them and look for a ledge to the left to dash to, and follow the ledge to a gravesite where a husk holds the Tool. Be ready to deal with two small Gromlings that will burrow from each wall to ambush you.
The Dead Bug’s Purse is best used when exploring an unknown region where you feel it might not be possible to get back to the site of your death and retrieve your Rosaries easily. However, you may also want to be on the lookout for Silkeaters, which can negate the need for this tool by restoring your currency and silk without having to find where you died.
Plasmium Phial
- Tool Type: Red
- Effect: Inject yourself with Plasmium to add temporary blue life points that are removed when damage is taken.
- Requirement: Cling Grip, Simple Key
The Plasmium Phial is a quest reward for completing Alchemist Zylotol’s Wish, the Alchemist’s Assistant in the optional region of the Wormways. However, you cannot access this area of the region without using a Simple Key, and you’ll need the Cling Grip to reach Zylotol.
With a Simple Key, head across the large chasm above Bone Bottom to the left to find a locked door you can open into the Wormways, and move left and then upward. Look for a small vertical shaft as you climb where worms are not dropping from, and wall-jump up past an intersection to keep traveling upwards to find the alchemist’s workshop.
Speak with Zylotol repeatedly, and he’ll ask if you can help complete his assistant’s research by using a temporary Needle Phial on 3 different Plasmium Buds found in the Wormways. Return to him with all 3 samples (See the locations in the map above), and he’ll award you the tool.
The Plasmium Phial is a very interesting consumable tool, as much like the Fleabrew it will buff Hornet rather than throwing out offensive weaponry. It also cannot be replenished with Shell Shards, and you’ll instead need to refill its reserves by paying Zylotol. By using it, Hornet will inject herself with Plasmium, gaining a temporary blue health point on top of your normal health. Unlike your normal health points, it cannot be healed back with Bind, but you can use the Phial repeatedly to give yourself several extra health points, which can give you a much-needed buffer for tough boss fights.
The Plasmium Phial also hides an alarming secret. By injecting yourself to gain 9 blue health points, your entire set of health masks will be replaced. After they all disappear, you’ll slowly begin to regenerate blue health masks over time. This effect means you cannot use the phial to gain more health, but must instead wait for them to regenerate on their own (binding will also only heal a single point). However, this state can be reverted by resting at a bench (including warping, dying, or quitting), and using bellways.
Magnetite Dice
- Tool Type: Yellow
- Effect: Gain a small chance to randomly avoid taking damage from a single hit.
- Requirement: None
The Magnetite Dice is a Tool that can be gained from a friendly pilgrim named Lumble the Lucky who resides in the Blasted Steps.
You can find Lumble by climbing up the Blasted Steps region until you reach the Bellway and Bench area at the top of a high vertical room, and then continue left down several passageways to a dead end.
There are a few ways to get the dice from Lumble. He’ll offer to play a game of dice with you, with the winner taking 4 Rosaries. If you can clean him out, he’ll give you the Magentite Dice as compensation (some users report having to win 10 times in a row, but we won 4 times from the start and were given the dice). You can even rig the game in your favor by holding the button to throw them until the dice glow and then release the button to toss them.
Alternatively, if you continue on through the Blasted Steps and reach the Citadel to begin Act 2, you can return to find him dead, and the dice will be free to take.
The Magnetite Dice are pretty mysterious, but incredibly useful no matter what build you wish to create from your tools. Each time you would normally take damage from a source, there will be a rising percentage to become shielded from that damage (signified by a chime and a blue aura around Hornet). This chance appears to rise by around 2% each time you are hit to cap at a 10% chance until the effect is triggered, after which it will reset the chance back to 0.
Delver’s Drill
- Tool Type: Red
- Effect: Attacks with a downward drill to strike enemies below multiple times.
- Requirement: None
The Delver’s Drill is an offensive tool that can be found deep in the Underworks on the western side that you can explore on your first arrival to the Citadel.
To reach it, from where the Grand Gate lift crashes down by the western-most bench, traverse a large circle to end up at the very top of the first large vertical shaft room, and trigger a switch to send materials crashing down to create a hole to the bottom of the vertical room.
Drop down the pathway you’ve created, and look for another switch on the bottom right to raise another block to reveal a passage in the bottom right corner of the room, and follow it to find a workbench holding the tool.
The Delver’s Drill is a tricky but effective tool that has no ranged capabilities, but instead converts Hornet into a large drill that fires downward, hitting multiple times on anything she connects with. This makes it highly effective against large ground-based or otherwise stationary targets, but less effective on agile or airborne enemies.
Ascendant’s Grip
- Tool Type: Yellow
- Effect: Allows you to hold your position while clinging to a wall.
- Requirement: None
The Ascendant’s Grip is sold in the town of Songclave in the Choral Chambers by the merchant Jubilana for 350 Rosaries. However, you will first need to establish the settlement, and then find the merchant by completing The Wandering Merchant side quest that appears on the town’s Wish Board.
You can help create this sanctuary when first exploring the Citadel in Act 2 by heading up to the very top right of the Choral Chambers, and interacting with the First Shrine to ring the bell. When you return, Songclave will have established, allowing you to take on a quest to find a missing merchant.
Jubilana can be found in the middle of the Choral Chambers, off a large vertical room below the central bench (and below a dining hall), off in a small darkened room to the left and being harassed by citadel guards. Once you’ve dealt with the enemies, she’ll thank you and return to Songclave, allowing you to purchase the items.
The Ascendant’s Grip is a useful tool in both platforming and combat challenges where positioning or evasion is key. You will no longer automatically slide down walls when clinging to them (and must push down to manually trigger the slide). This can be useful in arenas where floor space is limited or you need to get out of the way of large ground-based attacks, and can also help for more precise wall-jumping that requires you to time your jumps.
Spool Extender
- Tool Type: Blue
- Effect: Grants additional Silk Spools.
- Requirement: None
The Spool Extender is sold in the town of Songclave in the Choral Chambers by the merchant Jubilana for 720 Rosaries. However, as with the Ascendant’s Grips, you will first need to establish the settlement, and then find the merchant by completing The Wandering Merchant side quest that appears on the town’s Wish Board.
The Spool Extender is a useful tool that essentially gives you an extra spool to your total Silk meter, as if you had found two Spool Fragments. Given that it extends the maximum Silk you can store, it can help you perform more Silk Skills while still having enough reserve Silk for a Bind. However, if you rarely seem to be reaching your max Silk limit, the tool has little use.
Claw Mirror
- Tool Type: Blue
- Effect: When binding, emits a powerful flash of light that damages nearby enemies.
- Requirement: None
The Claw Mirror is a defensive tool that can be gained by defeating the optional boss Trobbio, located on the grand Stage on the western border of the Whispering Vaults leading back to the Choral Chambers.
As one of the main pathways leading down to the Underworks Cauldron, you’re likely to encounter Trobbio as you seek out the means to obtain the Threefold Melody in the Citadel. To unlock the path to Trobbio, you’ll need to take a long route down the Cogwork Core and then east to the Whispering Vaults.
Travel down the Vaults and look for a doorway on the left side featuring three faces, and you’ll locate the State where Trobbio waits (as well as a shortcut back to the Choral Chambers). Defeat Trobbio and his grand performance, and he’ll drop the Claw Mirror upon defeat.
The Claw Mirror is an excellent defensive tool that both helps ward off enemies while healing, and also rewards risky Binding near enemies. This can be further complimented with other tools like the Injector Band to increase the speed of your Binding, as well as the Witch Crest that allows you to lifesteal when Binding close to enemies.
Injector Band
- Tool Type: Blue
- Effect: Decreases the time needed to perform a Bind.
- Requirement: White Key
The Injector Band is a support tool that can be found in the optional region of Whiteward below the Citadel’s Choral Chambers, but requires a special White Key to access.
To access the lift into Whiteward, you’ll first need to travel to the top right of the Choral Chambers to the First Shrine (which later becomes the settlement of Songclave), and check the far right corner to find a White Key.
Next, use the White Key to access a large lift at the bottom of the Choral Chambers’ central vertical room, leading you to Whiteward.
You’ll need to take a counter-clockwise path to reach the eastern side of Whiteward. Climb up to the level above the cremation area, and travel left to a dead-end to find the tool.
The Injector Band is one of the most useful support tools you can have, as its ability to shorten the time for Binding has universal appeal regardless of how you want to structure your playstyle or loadout. It also pairs nicely with any other Tools that augment your bind, like the Claw Mirrors.
Cogwork Wheel
- Tool Type: Red
- Effect: Throws down a sawblade that travels along surfaces and up walls and ceilings in a straight path.
- Requirement: Clawline, Craftmetal
The Cogwork Wheel is an offensive tool, and one of several sold by the Twelfth Architect located in the Underworks’ Cauldron area (accessed either by defeating the boss in Whiteward, or Trobbio in the Whispering Vaults). You can purchase it for 360 Rosaries, but will also need to provide a Craftmetal.
Reaching the Twelfth Architect’s shop above the Cauldron on the east side of the Underworks will require the Clawline to reach, which lucky enough is also found directly below in the Cauldron itself. You’ll need to take a circular route to reach it from where the Architect works, and then latch onto a ring above the bench to jump up to her workshop.
The Cogwork Wheel is a useful crowd-clearing tool for its ability to mow down anything in its path, and the ability to climb up walls can also help against agile enemies in small arenas that may try to jump or float near walls and ceilings. However, due to its short tossing distance, it’s less useful against flying enemies in larger rooms with little wall coverage.
Sawtooth Circlet
- Tool Type: Blue
- Effect: Activating the Drifter’s Cloak creates a ring of blades around you.
- Requirement: Clawline, Craftmetal
The Sawtooth Circlet is an lethal defensive tool, and one of several sold by the Twelfth Architect located in the Underworks’ Cauldron area. You can purchase it for 230 Rosaries, but will also need to provide a Craftmetal.
This tool acts as an effective deterrent and is exceptionally useful against airborne or large enemies, giving you an extra attack while in the air. Any time you tap and hold the jump button while in the air to float using the Drifter’s Cloak, Hornet will also unleash a circular arc of blades around you, which can combo nicely with your downward pogo strikes. However, it is worth noting that this damaging effect can also extend to potential platforms, making it a possible hindrance when its deployed in areas with crumbling or temporary platforms in Bilewater, Mount Fay, or similar regions.
Scuttlebrace
- Tool Type: Yellow
- Effect: Allows you to perform an evasive backward high-speed dodge.
- Requirement: Clawline, Craftmetal
The Scuttlebrace is a evasive utility tool, and one of several sold by the Twelfth Architect located in the Underworks’ Cauldron area. You can purchase it for 140 Rosaries, but will also need to provide a Craftmetal.
This tool can be a particular boon for bolstering Hornet’s evasive capabilities, but may take a bit of getting use to. With the Scuttlebrace equipped, you can hold down while pressing the dash button to perform a quick retreat in the opposite direction, which can help you avoid attacks that otherwise might be too hard to turn and dash away from. However, it may take some practice to not accidentally dash forward and into an enemy, and it less useful when battles take you off the ground.
Cogfly
- Tool Type: Red
- Effect: Creates a winged cogwork companion that seeks out and attacks nearby foes.
- Requirement: Clawline, Craftmetal
The Cogfly is an offensive support tool that can be found up in the High Halls of the Citadel, which requires the Clawline to reach, and a Craftmetal to create.
Once you’ve obtained the Clawline in the Underworks’ Cauldron, head to the top left of the Choral Chambers to use the Clawline to ride up into the High Halls, and travel up and to the right until you reach a long vertical room filled with spikes.
Float down and use the Clawline twice to unlock new pathways to float downward, until you reach a ledge with a doorway on the left. Inside, you’ll find an abandoned workbench full of Cogflies, and with a Craftmetal in hand, you can craft one yourself.
The Cogfly is an excellent support tool to supplement your offenses, especially against large hordes of enemies, or even for whittling down a troublesome boss. You can deploy up to 4 at a time, and they will attack 5 times before breaking down. They are also useful against challenging opponents or groups where you can focus on evasion while letting your Cogflies deal the damage. However, be sure to avoid using them where enemies are required to bounce off with the Clawline or other abilities, as Cogflies may attack them first.
Rosary Cannon
- Tool Type: Red
- Effect: A repurposed Rosary mechanism that can load your currency into, to be rapidly fired at enemies.
- Requirement: Clawline, Simple Key
The Rosary Cannon is a powerful but costly offensive tool that can be found up in the High Halls of the Citadel, which requires the Clawline to reach, and one of the four Simple Keys to unlock access to the Vault where it is stored.
Once you’ve obtained the Clawline in the Underworks’ Cauldron, head to the top left of the Choral Chambers to use the Clawline to ride up into the High Halls, and travel up and to the right until you reach a long vertical room filled with spikes. Carefully float all the way down the room to reach the ground floor of the High Halls, with a Ventrica and bench to the right, and Forum battle to the left. Just above the Forum entrance is a locked door marked with a Rosary icon that you can unlock with a Simple Key.
Once inside the Vault, travel through the ducts in a clockwise manner to find a floor grate you can break up into the central vault. Just below this, you can find a panel on the lower left wall that can be broken, leading to more ducts.
Follow this pathway left to reach an area under the Rosary String machine at the Vault Entrance. Attack it, and the Rosary Cannon will be dislodged.
As its name implies, the tool can deal a lot of damage, but you’ll want to make sure you have a large supply of Rosaries you don’t mind parting with. While the trajectory is limited, it shoots out Rosaries in rapid succession making it quite effective against slow, stationary targets or small groups. However, you will have to manually load it with Rosaries, and its likely best saved for after you’ve bought most things in the game.
Memory Crystal
- Tool Type: Blue
- Effect: Creates a crystal memory of Hornet when damage is taken, and explodes into sharp spines if an enemy touches it.
- Requirement: Clawline
The Memory Crystal is an offensive support tool that can be found along the bottom of Mount Fay, which requires the Clawline to reach.
Once you have gained the Clawline from the Underworks’ Cauldron, enter the mountain region through The Slab, and make your way up the winding mountain trail above Shakra, until you fall down a large shaft and cross a chilled lake.
Once you reach a heated stone interior area, exit to the left, drop down, and attack the bottom right wall to return back inside to find a Bench.
To find the tool, strike the right side of the room past the bench to reveal a hidden cavern. The area is full of regenerating icy shards you’ll need to break a path through to the right to find another heated area, and attack the large crystal chunk on the wall to uncover the tool.
The Memory Crystal is an efficient defensive tool that essentially allows you to automatically place traps whenever you take damage. The crystal version of Hornet that appears after being attacked has a large blast radius similar to the Sting Shard but does not require Shell Shards to use, though it does rely on taking damage. It is still an effective counter attack against nimble enemies.
Thief’s Mark
- Tool Type: Yellow
- Effect: Allows you to gain extra Rosaries from defeated foes, but Rosaries will be dropped on taking damage.
- Requirement: Faydown Cloak
The Thief’s Mark is a lucrative utility tool that can be purchased from Grindle at his ship in the Blasted Steps for 350 Rosaries, but will require the Faydown Cloak to reach.
Once you have climbed Mount Fay, you can return to the Blasted Steps Bellway and head left to find a large vertical room. Look up on the left for a crude sign and enter the room, and double jump up to reach Grindle where you can purchase his ill-gotten gains.
The Thief’s Mark is an effective risk-reward tool that can let you earn a lot more resources as long as you can avoid taking damage. When combined with other risky tools like the Barbed Bracelet, it can become an incredibly effective farming tool when used to blitz through enemies like the Grand Reeds before they can respond to your attacks.
Snitch Pick
- Tool Type: Blue
- Effect: Pierce an enemy’s shell and steal resources from them.
- Requirement: Faydown Cloak
The Snitch Pick is a resource-gathering support tool that can be purchased from Grindle at his shop in the Blasted Steps for 740 Rosaries, but will require the Faydown Cloak to reach.
Once you have climbed Mount Fay, you can return to the Blasted Steps Bellway and head left to find a large vertical room. Look up on the left for a crude sign and enter the room, and double jump up to reach Grindle where you can purchase his ill-gotten gains.
The Snitch Pick effectively upgrades your Clawline to be able to pierce enemies and pull out Rosaries or Shell Shards from their body, allowing you to collect more resources from enemies. However, the amount you can claim is fairly negligible, and in the time it takes to harvest you can simply defeat the enemy and gain far more resources.
Reserve Bind
- Tool Type: Blue
- Effect: Holds a single Bind’s worth of Silk that can be used if you do not otherwise have the reserves needed.
- Requirement: Faydown Cloak, 3 Cogheart Pieces
The Reserve Bind is an important support tool that can only be gained by defeating the Second Sentinel in a duel, and completing their Wish, Last Audience — which will take several steps to complete.
To start, you’ll need to climb Mount Fay to gain the Faydown Cloak’s double jump ability. With it, return back to the Cogwork Core and enter the door on the left below the bench.
You can double jump up past the two enemies to find a high landing, and down the hall is an unpowered cogwork creation.
To complete the Second Sentinel, you’ll need to search the Citadel for three Cogwork Heart Pieces. One can be found on the far west of the Choral Chambers, in a small room above the bridge to The Slab.
A second piece can be found in the Whispering Vaults, in a darkened room just below the entrance to the Stage where Trobbio performs.
The final piece can be found up in the Memorium (which also requires the Faydown Cloak), on the far right side of the second level.
Return all three pieces to activate the Second Sentinel, who will vanish. You’ll need to explore the Choral Chambers and encounter them defeating enemies a few times before their Wish appears on the Songclave board. This will lead you back to the High Halls, into a new area to the left of the Ventrica station, and above the main foyer and entrance to the Forum.
Defeat the Second Sentinel in combat, and they will gift you the tool, parting as friends.
The Reserve Bind is a fantastic tool that works like an emergency heal. It can only be used once before needing to return to a bench to replenish, but if you try to Bind without enough Silk, the Reserve Bind will be activated in its place. You’ll just need to be sure to actually save it for emergencies, instead of accidentally triggering it before its needed.
Conchcutter
- Tool Type: Red
- Effect: Fires a spiral weapon at an angle that can ricochet off surfaces several times.
- Requirement: Clawline, Faydown Cloak (recommended)
The Conchcutter is a tactical offensive tool that can be obtained at the very end of the Sands of Karak, which requires getting through a large and grueling platforming section.
To reach this region, you’ll need the Clawline ability, but due to the complexity of the platforming, we highly recommend grabbing the Faydown Cloak for the double jump ability. You can reach the Sands of Karak above the Pinstress’ home in the Blasted Steps, by using the hanging rings above her home.
The tool is located in the Coral Tower, which will require you to navigate several large stretches of worm-infested sands, and dislodging pearls to create temporary branchway paths of platforms and hazards to bounce across.
Once you reach the very top left corner of the region, defeat the Raging Conchfly, and then enter the Coral Tower to find the Conchcutter in front of the long expired Crust King.
The Conchcutter is an extremely effective offensive tool in tight spaces, due to its ability to bounce off surfaces and hit enemies from multiple angles as it drills through them. Consider using it in smaller arenas or against slow-moving big targets, however due to its odd diagonal trajectory path, it’s a bit less effective in large open areas.
Wispfire Lantern
- Tool Type: Blue
- Effect: Creates explosive Wisps that seek out enemies when they are present, but will consume Silk to create.
- Requirement: Faydown Cloak
The Wispfire Lantern is a powerful support tool that can be found in the optional region of the Wisp Thicket high above Greymoor, and gained by defeating the boss of this area.
With the Faydown Cloak’s double jump, return to Greymoor and climb up the rightmost mill building to the left of the Halfway Home, and exit out through the roof and up to a grassy area above Greymoor.
While in this grassy area, climb up the top left section to reveal a path to the Wisp Thicket.
In this optional region, head all the way to the left to enter a large bell where you’ll encounter a different kind of boss, the Father of the Flame. Defeat it by destroying all the wicker sections that create Wisps, and upon its defeat you’ll be granted the tool.
The Wispfire Lantern is an exceptionally powerful tool that will continually summon fiery allies to track down and explode into your enemies. Unlike the Cogfly, it doesn’t require Shell Shards to replenish, and they will continue to appear as long as you have Silk in your spool. However, this comes as a double-edged sword, as Wisps will be created from Silk whenever you encounter enemies whether you want them to appear or not, and can take away Silk needed for Binds. It should also avoid being equipped when you need to use enemies to Clawline or platform.
Voltvessels
- Tool Type: Red
- Effect: Fires electric orbs that can be thrown as a bola to explode in the air, or transformed to stake into the ground and create a pillar of electricity.
- Requirement: Faydown Cloak
The Voltvessels are an offensive electric tool that can be located at the top of the Memorium, a region above the Citadel that requires the Faydown Cloak.
With the double jump ability, you can reach the overgrown area above the Choral Chambers, to the right of the Cogwork Core entrance.
You’ll need to make your way up to the highest level of the Memorium by taking the winding path upward to the leftmost vertical room, and enter the hallway across from the Vetrica station, covered in electrical blasts. Make your way to the far right of the specimen hall and past the Materium to climb up through some ducts.
Defeat the two Memoria guards that toss their own Voltvessels, and you’ll be able to gain the Tool yourself.
The Voltvessels are a strong offensive tool that boasts two different ways to deploy, making it great to respond to a variety of attackers. The bolas can be tossed through the air to detonate a small electrical field for catching airborne attackers, while the stake covers a large pillar to lock down slower moving or ground-based enemies.
Spider Strings
- Tool Type: Yellow
- Effect: Expands and enhances the effect of the Needolin ability.
- Requirement: Faydown Cloak
The Spider Strings is a utility tool that is sold in the town of Songclave in the Choral Chambers by the merchant Jubilana for 320 Rosaries. However, it is not part of her initial stock, and is only sold after completing the second wish to track her down during The Missing Merchant quest.
After Jubilana has taken up residence in Songclave, you’ll need to complete wishes for the town, including Strengthening Songclave, and then obtain the Faydown Cloak from Mount Fay. Once you do, Jubilana will disappear, prompting the quest to find her in the Memorium.
You can reach the Memorium area by climbing up the overgrown area atop the Choral Chambers, and moving through the second level all the way to the right, and down to a map room. It’s here you’ll find a hidden duct in the ceiling, leading to an exit outside onto a large bridge, where you can save Jubilana from some enemies. Once she returns back to Songclave, her inventory will be expanded to include the new tool.
The Spider Strings has a very specific utiltiy that only increases the Needolin’s ability to temporarily disorient enemies when used in combat, and can be used to stun and hold foes in place to plan your next move. However, it requires a good deal of timing and strategy to pull off.
Wreath of Purity
- Tool Type: Blue
- Effect: A protective band that repels Muckmaggots poison status, but can break after too much use and must be repaired at a bench.
- Requirement: Faydown Cloak
The Wreath of Purity is a highly essential support tool that can be found within the Putrified Ducts, a hidden region high in the northwest of Pharloom.
Getting to the Putrified Ducts will require moving through the Memorium area atop the Choral Chambers, and moving up through a hidden duct in the map room on the far right of the first level to exit outside onto a large bridge, where you can climb up the far right wall to find a way into this region.
Once in the Putrified Ducts, make your way right and down from the Bellway, and right again to reach a large, long aqueduct hallway filled with enemies and poison water below. Make your way to the far right side of the room, and then jump up and Clawline through the Barnack enemy along the ceiling to the top left wall to find a pathway through.
Make your way back left along the top of this room to find a ceiling hatch you can jump up through, and then go right through the next room to find an abandoned wooden platform with a husk that holds the Purified Wreath.
In the right circumstance, the Wreath of Purity is one of the most essential Tools you can have, as it will make traversing poison areas like Sinner’s Road, Bilewater, and the Putrified Ducts much easier, and the same holds true for fighting bosses that can inflict the muckmaggot poison status. With the tool, you’ll be able to resist the effect up to 12 times (or around 12 seconds of wading through muckmaggot water) before the tool shatters and becomes inert until you rest at a bench, whereupon it will automatically repair itself.
Quick Sling
- Tool Type: Blue
- Effect: Doubles the amount of Red Tool projectiles that are thrown out.
- Requirement: Faydown Cloak
The Quick Sling is a support Tool that can be found within the region of Bilewater’s upper areas.
To find this Tool, you’ll need to have acquired the Faydown Cloak from Mount Fay so that you can begin double-jumping up the large vertical room where Shakra can be found just off to the side.
Continue to climb up the large vertical room to enter the doorway in the top right, and then pass through the next vertical room to a third smaller room. Climb up all the way to the top of the room, where you’ll find a trap on the top left ledge. Strike the top right corner opposite the trapped ledge, and you’ll find a secret area with a dead husk holding the tool.
With the right configuration, the Quick Sling can be a deadly addition to your offensive power, as any red tool that throws out projectiles will see that amount doubled for no extra cost. Essentially, you’ll be dealing double the damage while saving on your charges per tool. However, this won’t work on Tools that don’t throw out any projectiles, like the Fleabrew or Plasmium Phial.